If you need to pin one piece of fabric a small distance from an edge, e.g. pinning bias tape around a curve, but hate fiddling with the tape measure or ruler at the same time, mark the small distance on your thumbnail with an erasable marker and use that instead.
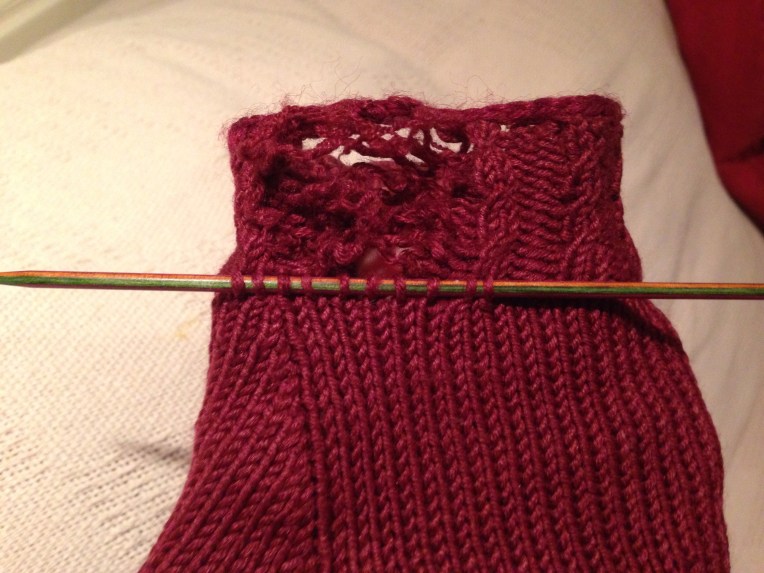
I made a school jumper 3 years ago for child#1 and it’s still in use for child #2. It was made with Debbie Bliss Cashmerino and washes quite well. It has frayed somewhat at the sleeves though.
I have learned the hard way why our ancestors worked their clothing bottom-up. If a garment frays at the hems, where it is most likely to, then the damage runs further and faster when the garment is made top-down, than if it’s made bottom-up.
I picked up stitches below the frayed area. I picked up a further 2 sts either side as well.
Then I worked in the original pattern (baby cable rib) for the same length as the cuff. I picked up a St from the jumper at the corresponding point at the start of each row. I cast off by working slip st into the cuff cast-off and slipping the previous St over. The cuff cast-off was quite firm actually, as I had replaced that recently.
Unfortunately, I don’t have any marching yarn and I had to guess at the needle size (3mm?), so this is a very visible mending. I’m quite determined that this jumper will last for as long as it fits. There may be more patching ahead!
Honestly though, I think I have to just bite the bullet and get another ball of baby Cashmerino and rework the cuffs.
In case you’ve not seen this neat way of making a swatch for an in-the-round project, here’s how to do it.
Use a pair of double-pointed needles. Cast on the required number of stitches. *Don’t turn the work, but instead push the sts back to the other end of the needle. Draw the yarn loosely across the back of the swatch. Work the next row as if it is the next round. Repeat from * for the required length of swatch. Cast off. Cut the strings at the back. Block and treat as the project is to be treated. Pin out and measure.
As with all swatches, measure across the central sts as the edge sts may be distorted.
Here are pics of a (small) swatch worked in this manner (a) from the front; (b) from the back and (c) pinned out for measuring with the strings cut.
Note, if the yarn is slippy, you may have to secure the edgemost stitches so that they don’t unravel. You can do this with a sewing machine or by crocheting the edge as you might do with a steek. It helps to have long lengths of yarn at the back.
I confess i’m a wee bit girly around DIY and usually shy away from using power tools if there’s a big man handy to do it instead. Not a great message to send my 7-yr old daughter, so am trying not to worry so much about cocking it up and Just Get On With It.
Our bathroom was originally put in by either a rank amateur or a bunch of con men cos nothing in it has ever worked or been leak free. The latest casualty is the shower thingy that holds the head up. It would slowly wander down the bar from over-head height down to navel level. For the past few days, my husband and I have had lovely clean torsos, but shampooing has been a bit of a palaver unless we sit down (or, you know, do it one-handed, v 80s, dahling).
So I decided this morning to bite the bullet and try and do this small bit of DIY. I have now learned about tiny hexagonal screwdriver heads for headless screws.
I’ve learned about which drill bit to use on ceramic tiles (masonry, if you don’t have a tile and glass one). I even know which drill bits are which:
Top is for wood, middle is HSS for metal and bottom for masonry.
I improvised a plumbline with a weight and not just any old string, but some hand dyed fairysilk mohair.
Gosh it’s a lovely day outside.
And ta dah! We have a working shower head holder thingy again. Yay me! Not bad for someone who’s heart was in their mouth the whole time that drill was making that noise. Anyway, now I have to go clean up the mess.
Oh, yes, one last thing, the old one left holes. Not sure how to hide those, I could google it, but what would you do?
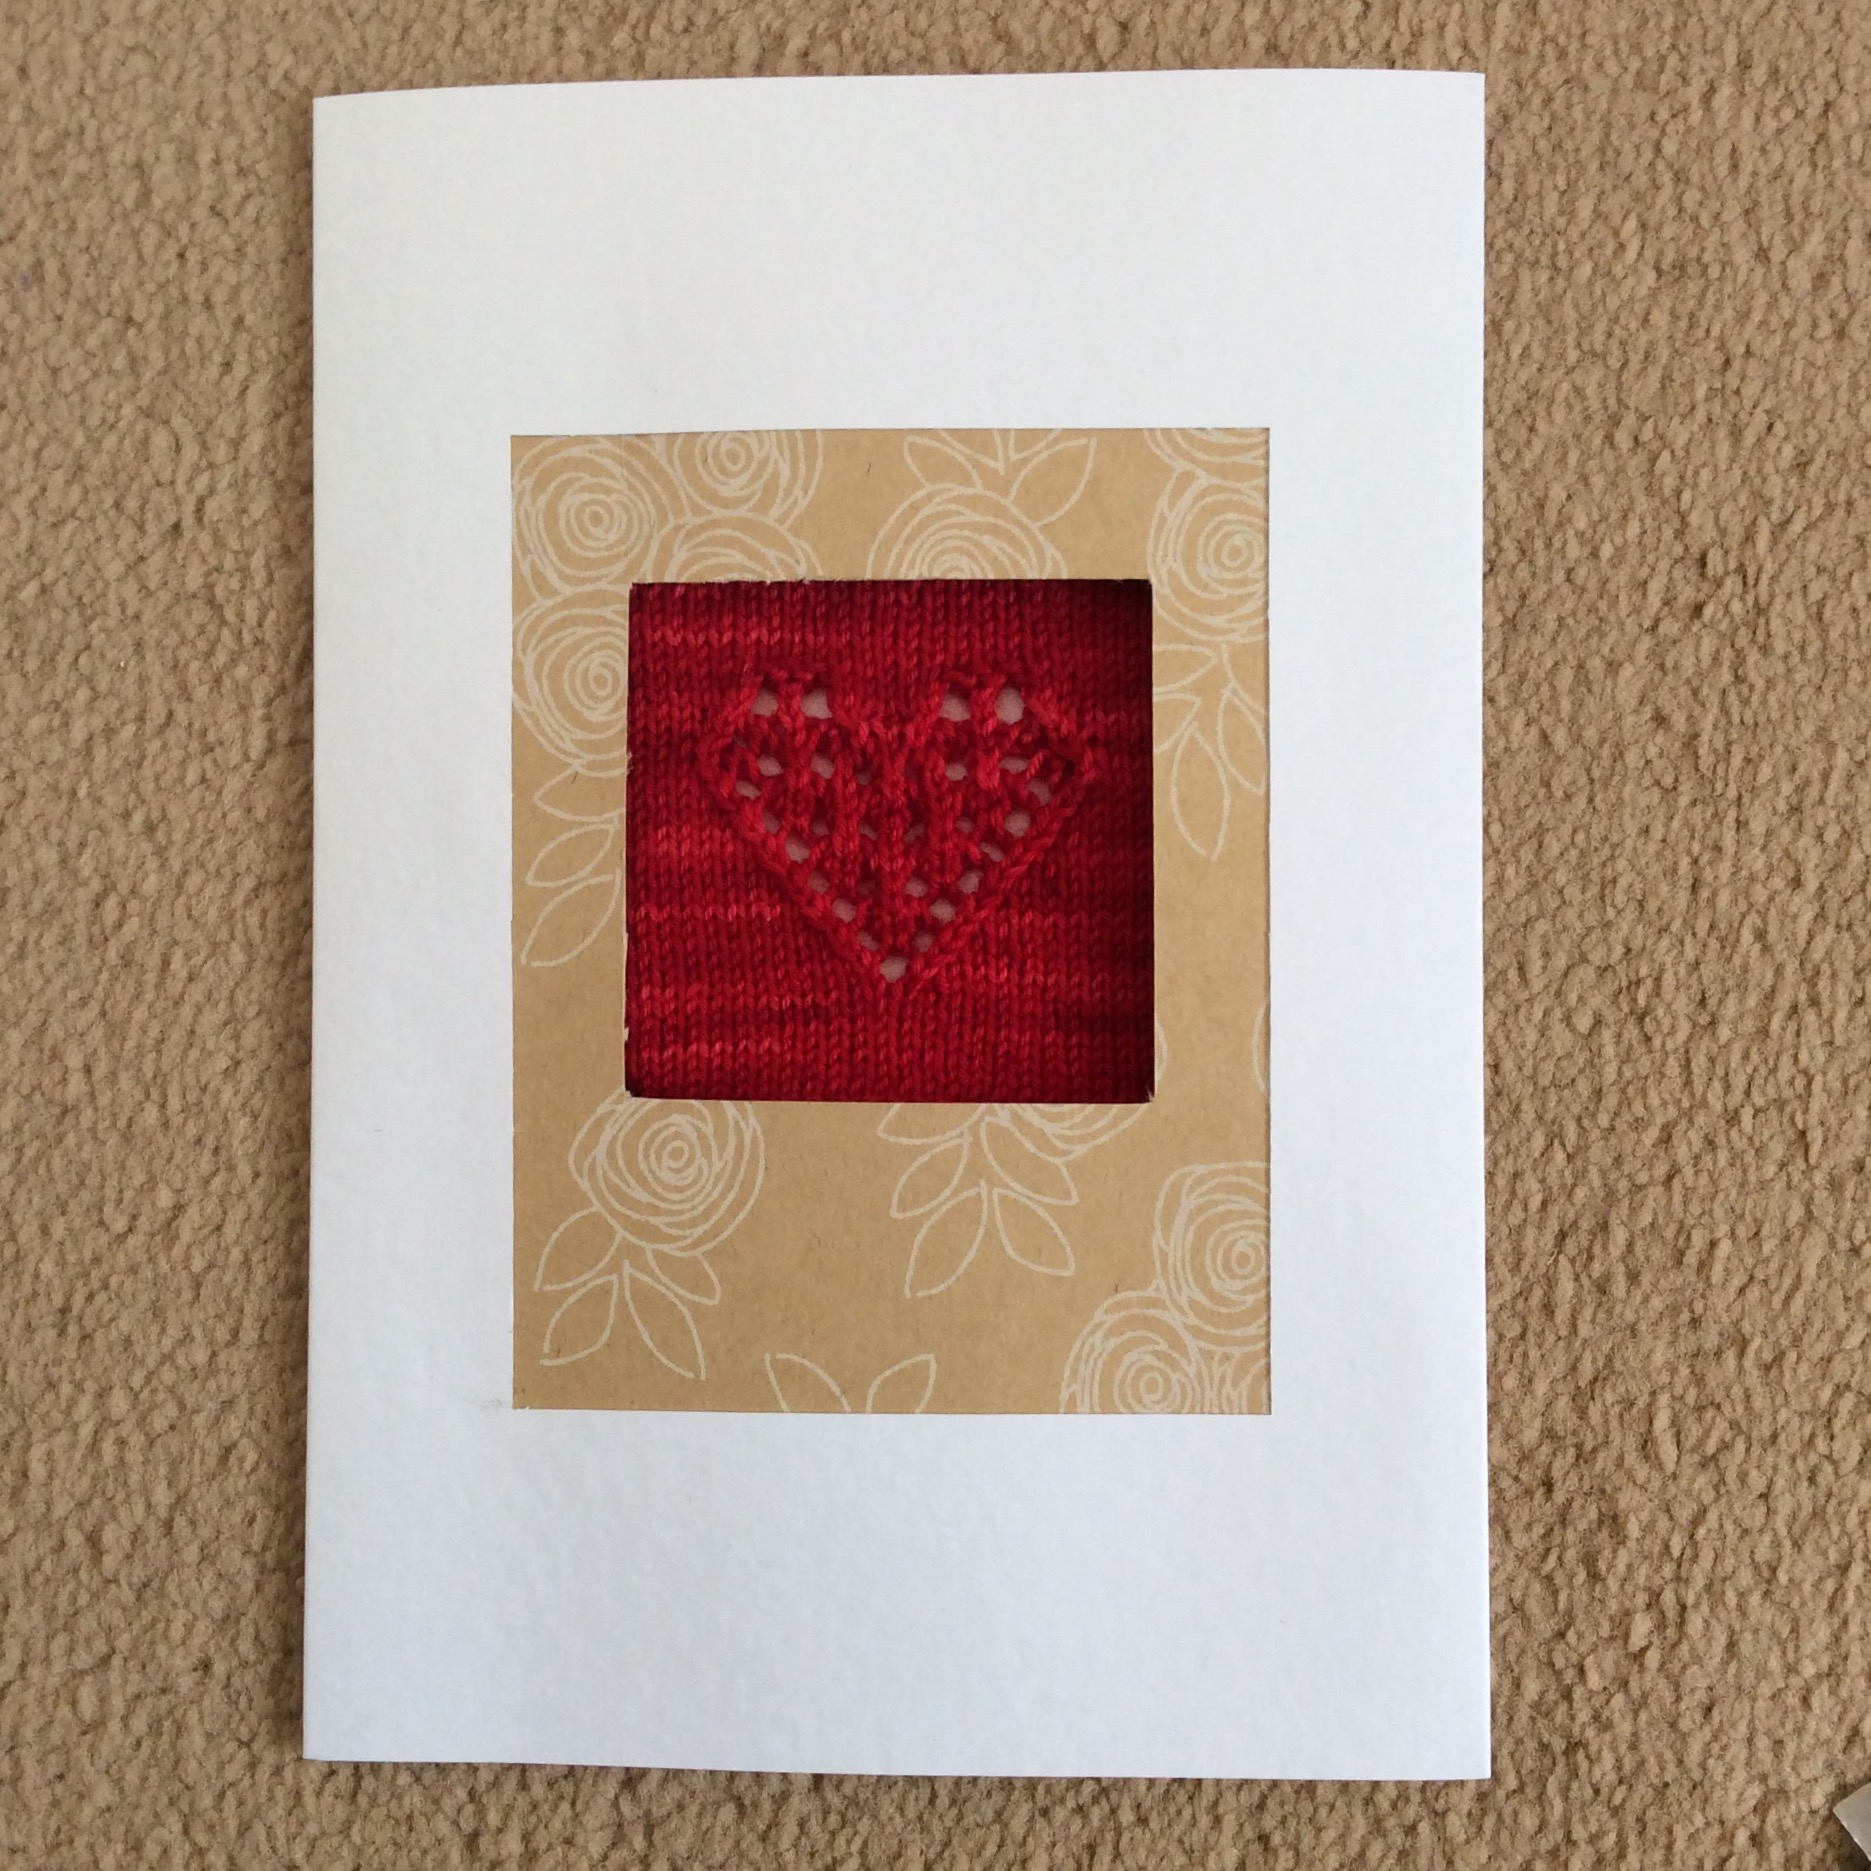
I made a Valentine’s Card for my lover, and I’m pleased enough with the result that I’d like to share it with you. Since it’s me making it, it’s partially knitted, of course!
Measurements
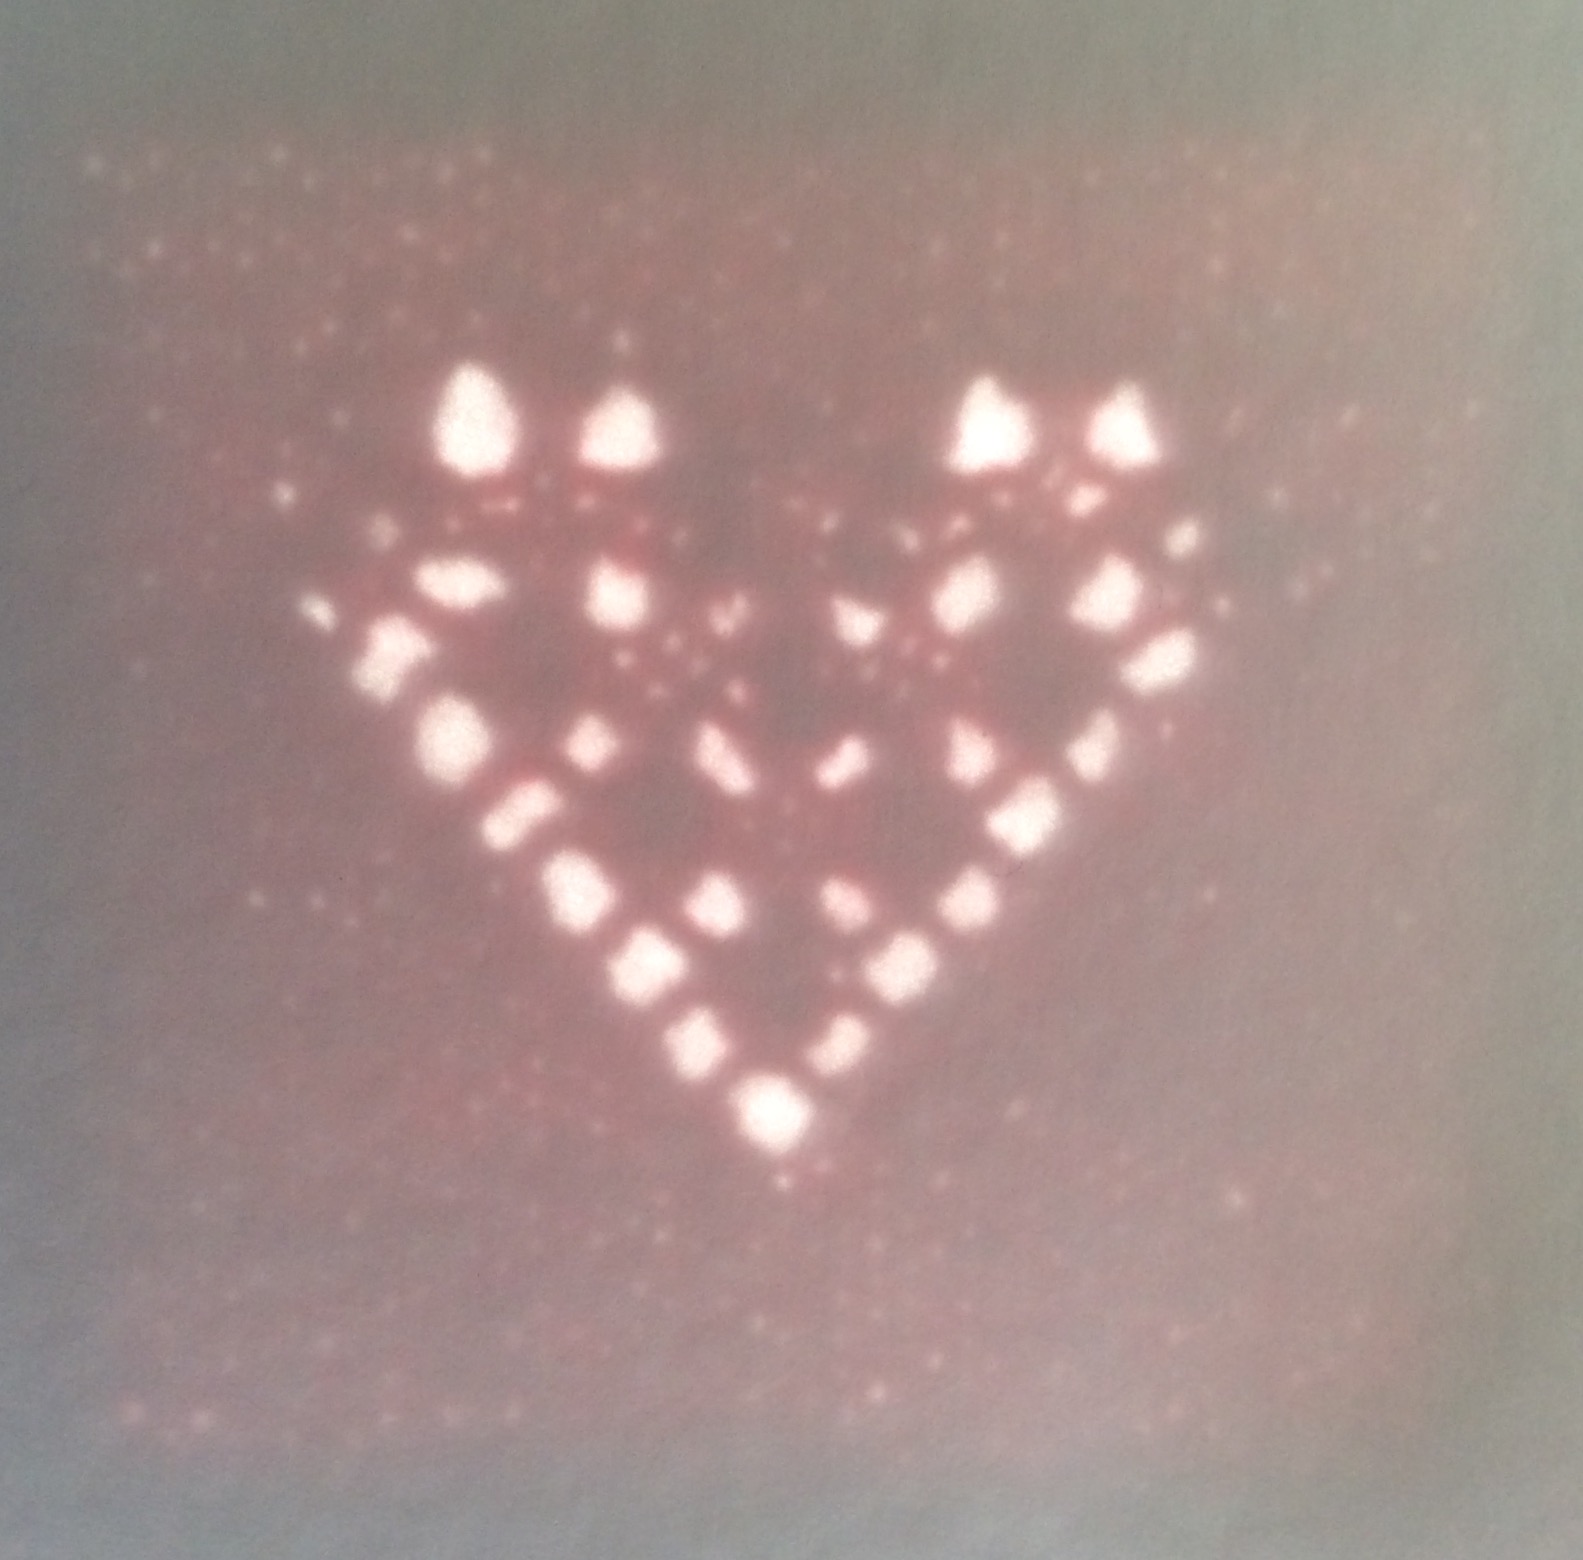
The finished motif is 9.5x9cm (3.75×3.5in)
Notes
All measurements are given horizontal width first, then vertical length.
Non-Knitting Materials Required
I bought my materials from Hobbycraft, but you’ll find similar products in most good stationers
1 A5 blank greetings card with pre-cut window
(If you want to make one yourself, cut some card to 44x21cm (17.25×8.25in), fold into thirds, and cut a window 9.5x12cm (3.75×4.75in) into the central panel.)
1 sheet decorative card (from the papercraft/scrapbooking aisle)
Scissors
Scalpel
Ruler
Stick glue
Glue dots
Optional: Computer & printer for interior motto
The back of the card with sunlight streaming through.
Abbreviations
Cdd: Slip next 2 sts knitwise, knit next st, pass 2 slipped sts over
CN: Cable needle
K: Knit
K2tog: Knit 2 sts together at the same time
LDC: Slip 1 st onto a cable needle, ssk from LH needle, K1 from CN
LH: Left hand
P: Purl
RDC: Slip 2 sts onto CN, K1 from LH needle, K2tog from CN
RS: Right side
Sl: Slip
Ssk: Slip 1 st knitwise, slip a second st knitwise, insert LH needle into front of 2 sts just slipped and knit together
St(s): Stitch(es)
WS: Wrong side
Yo: Yarn over
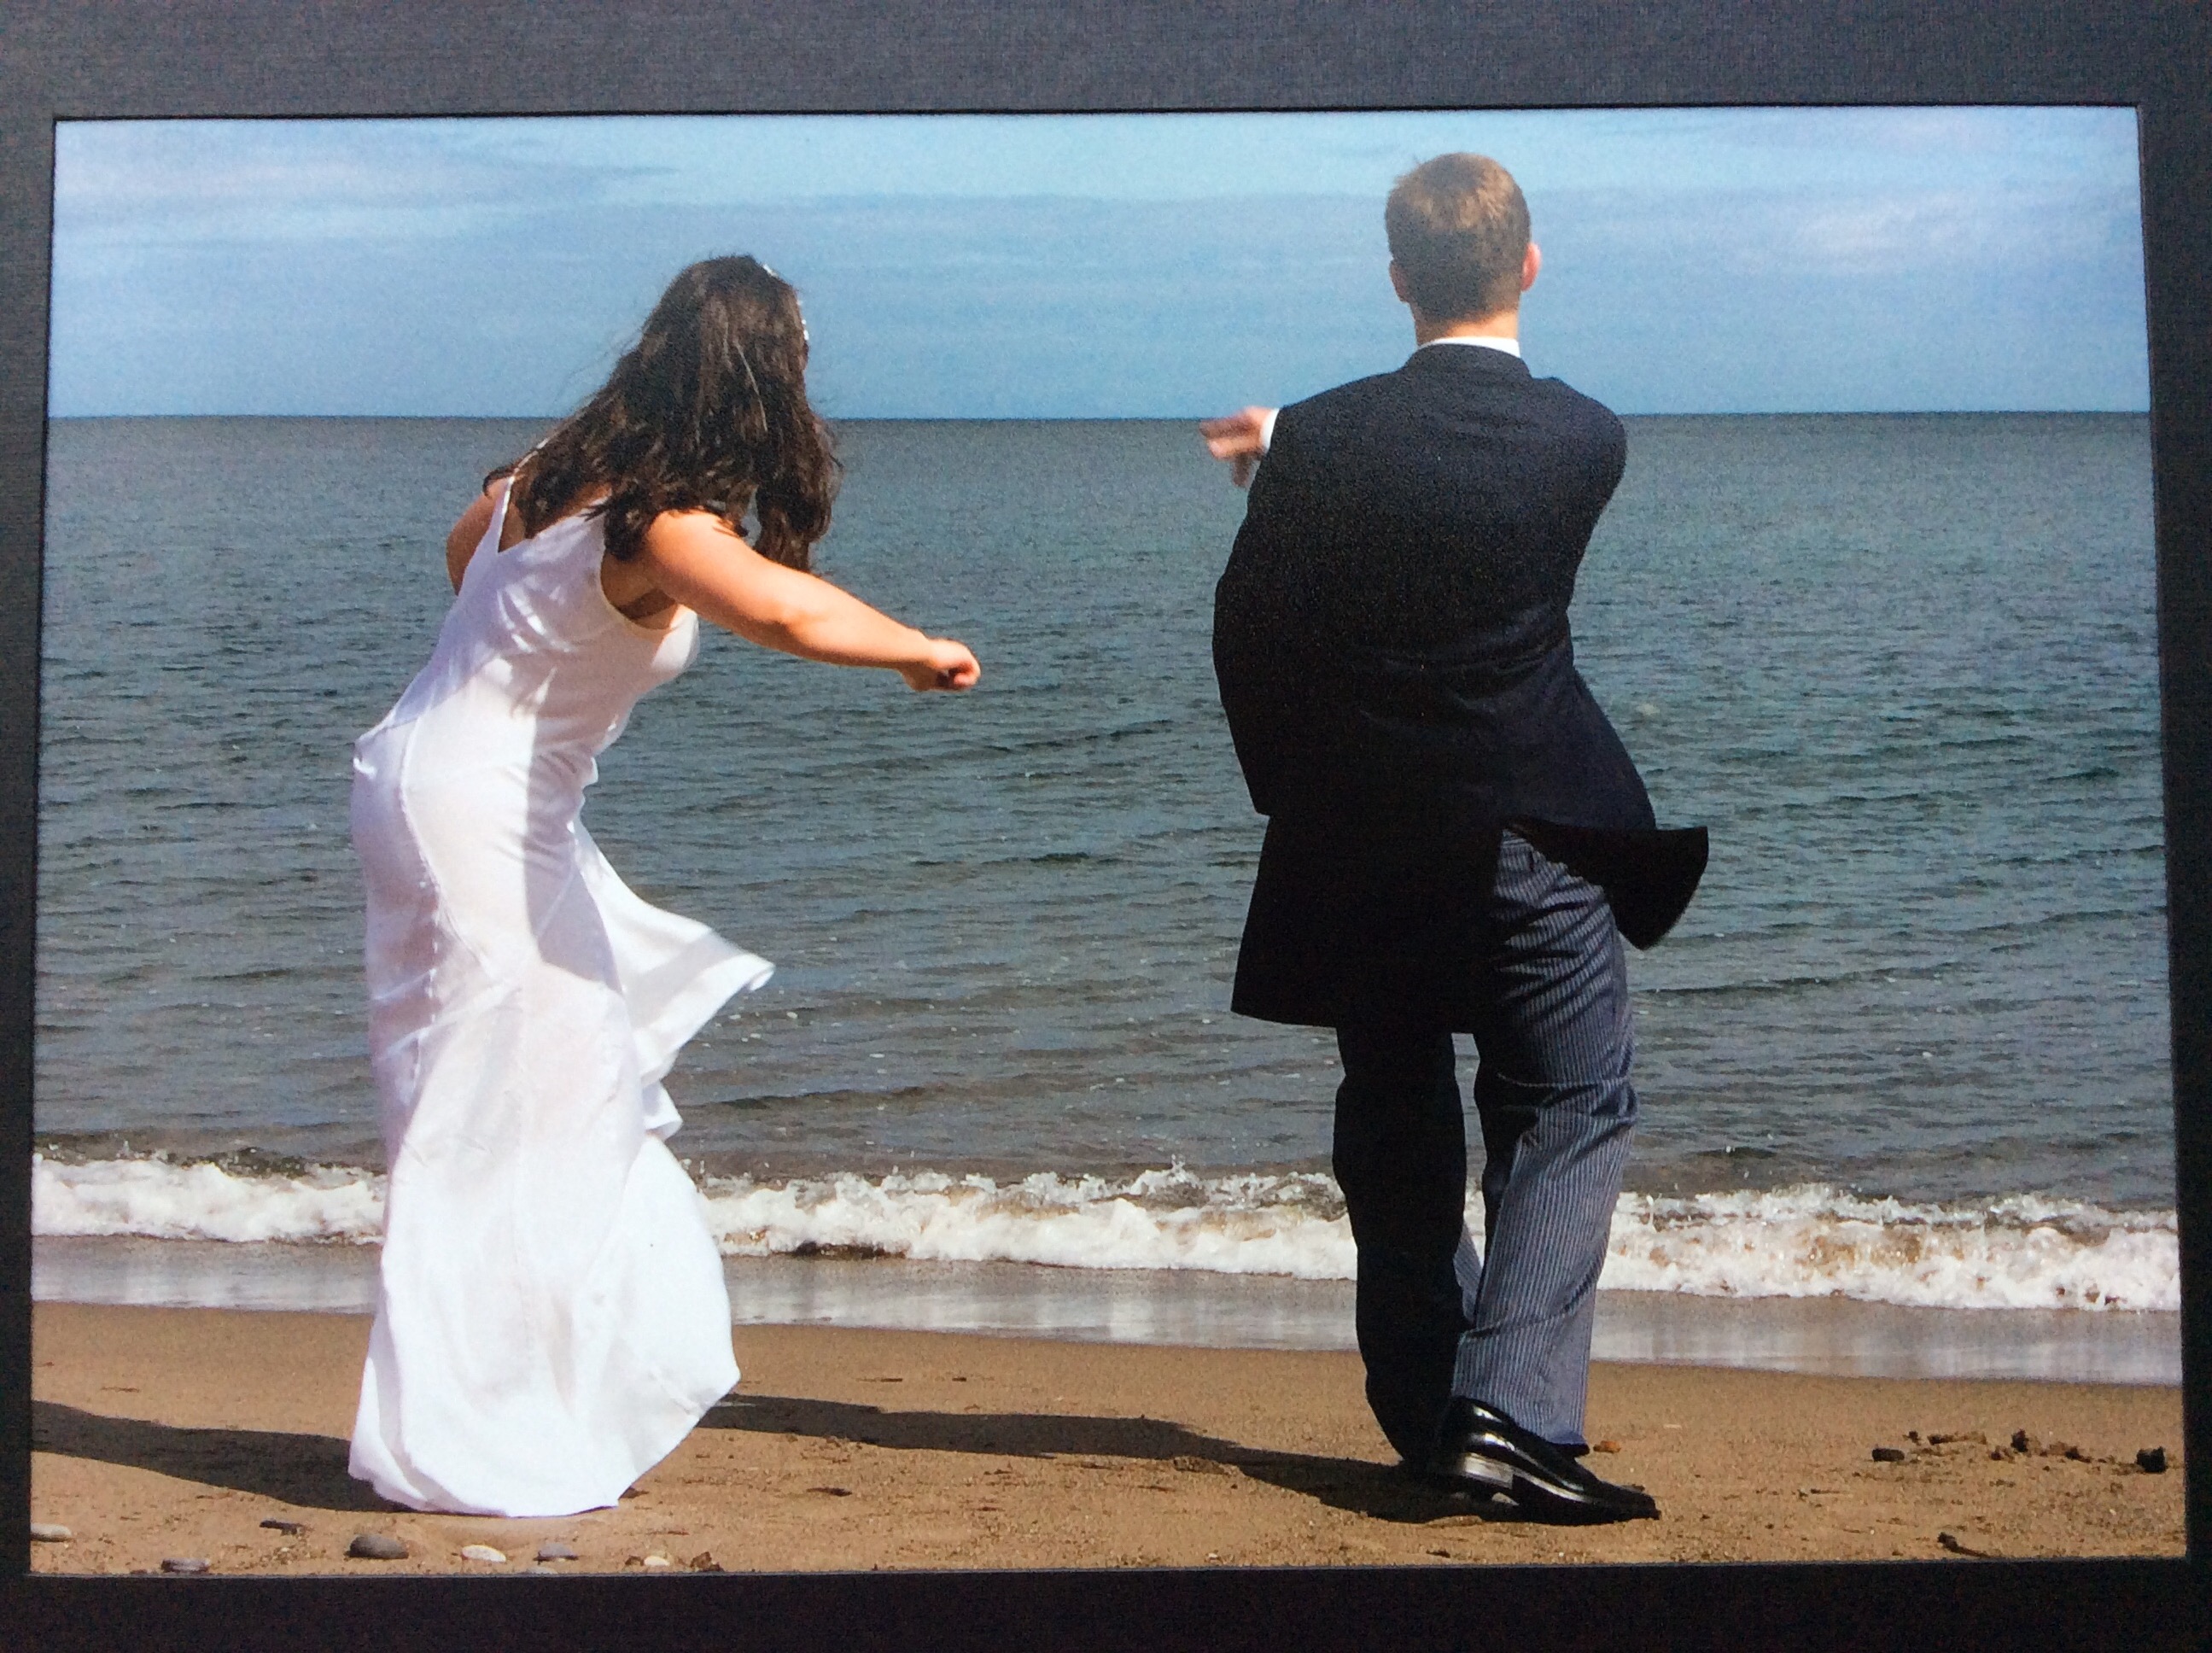
My lover and I skipping stones on Killiney Bay once upon a time.
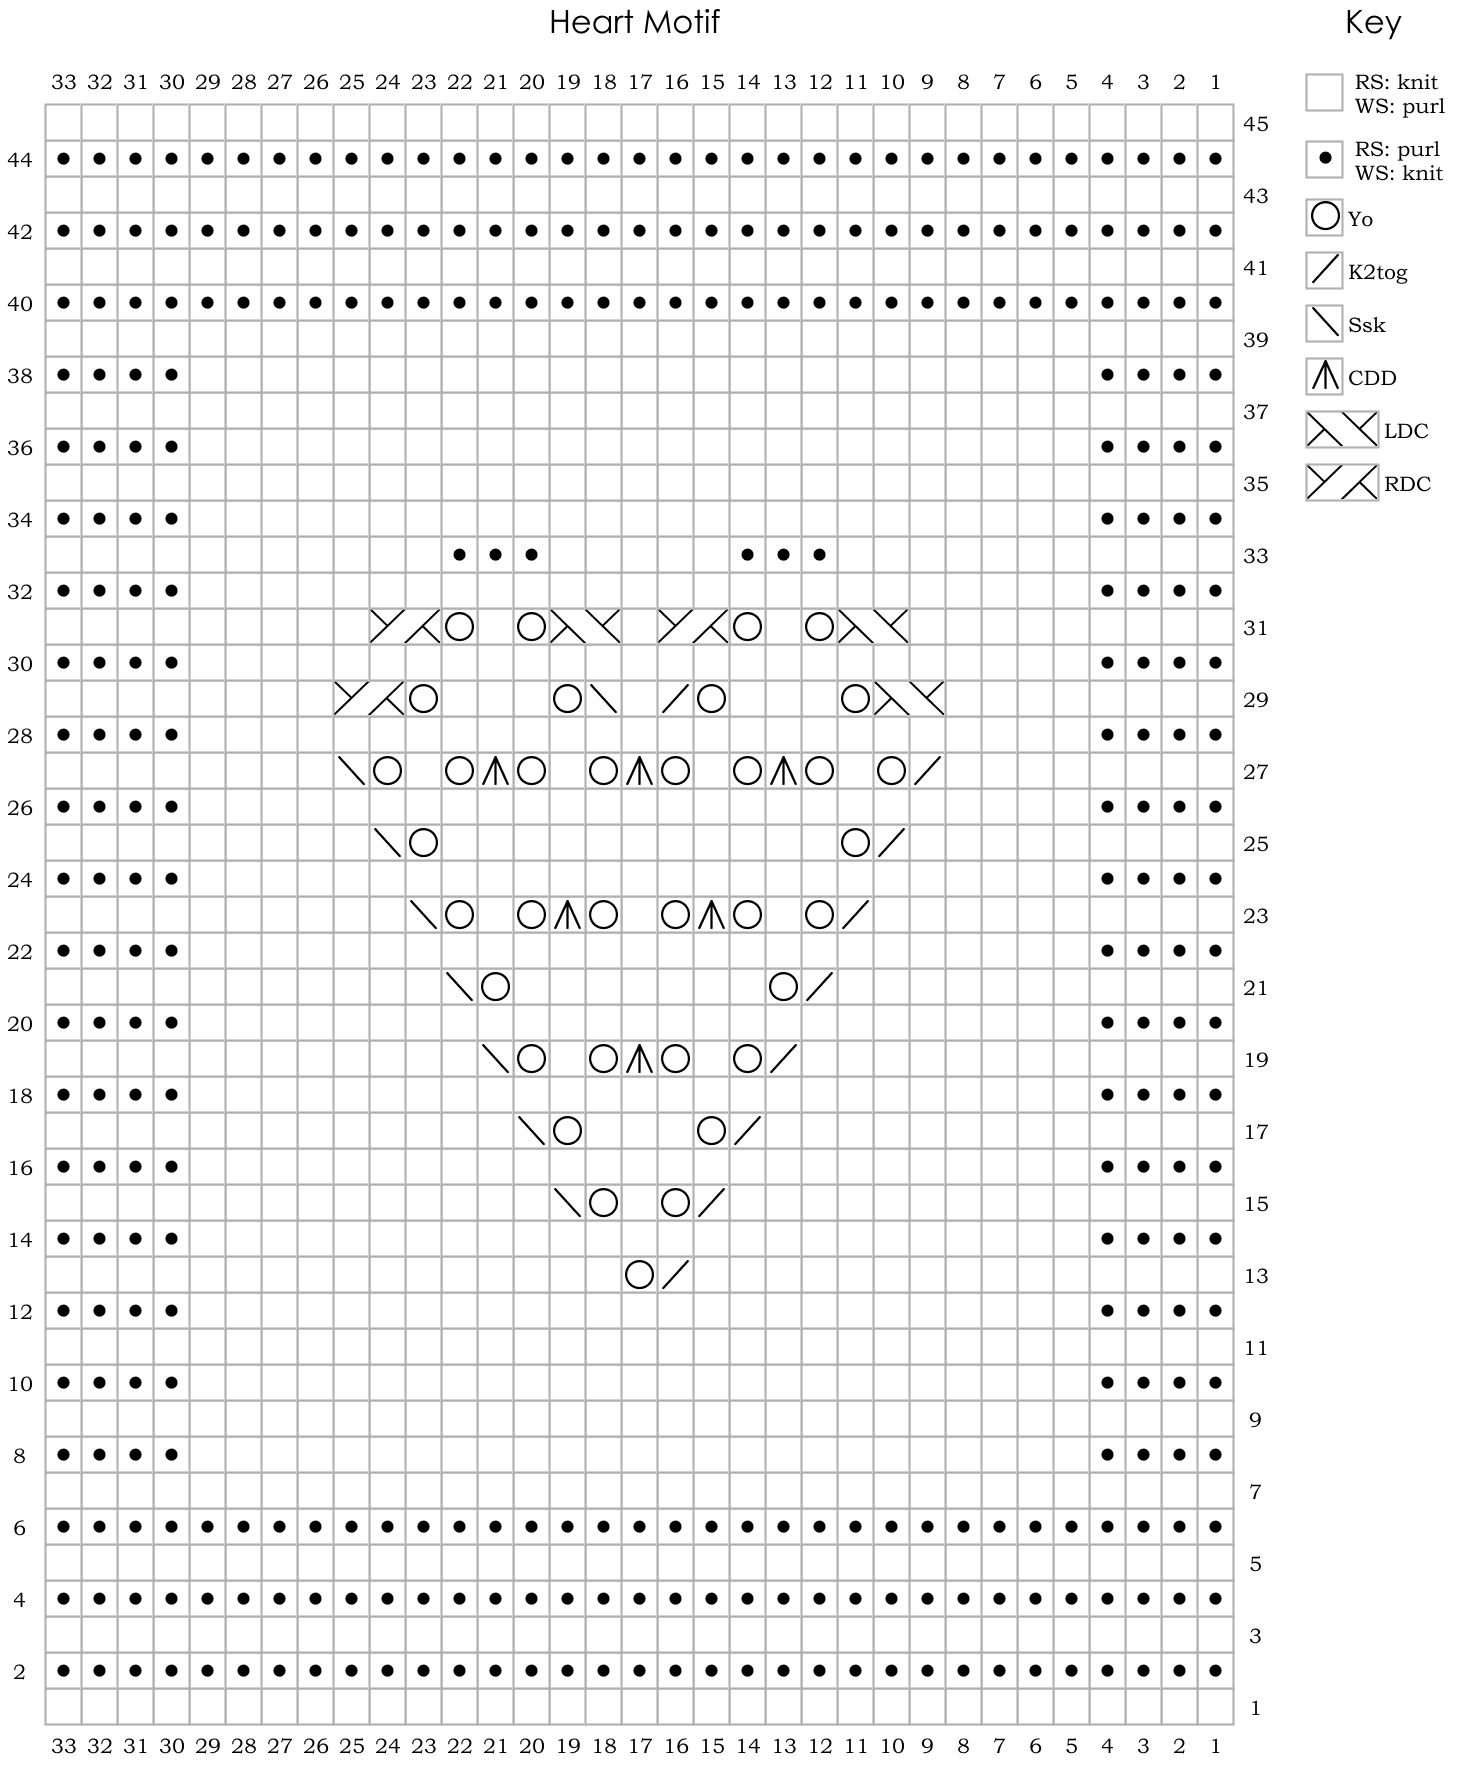
This motif is also charted in full. Read RS rows from right to left, and WS rows from left to right.
Block gently, following the care instructions on ball band. Weave in ends.
Assembling the greetings card
1. Take the decorative card and cut a piece 13.5x15cm (5.5x5in).
2. On the reverse of the card, mark out a square 6.5×6.5cm (2.5×2.5in). Centre the square on the horizontal. Position the top edge of the square 4cm (1.5in) from the top of the decorative card. Use a scalpel to cut the window from the decorative card.
3. Glue the decorative card to the inside of the greetings card on the middle panel, to give a “frame-within-a-frame” effect. Take care to keep the edges straight so your frames dont look wonky!
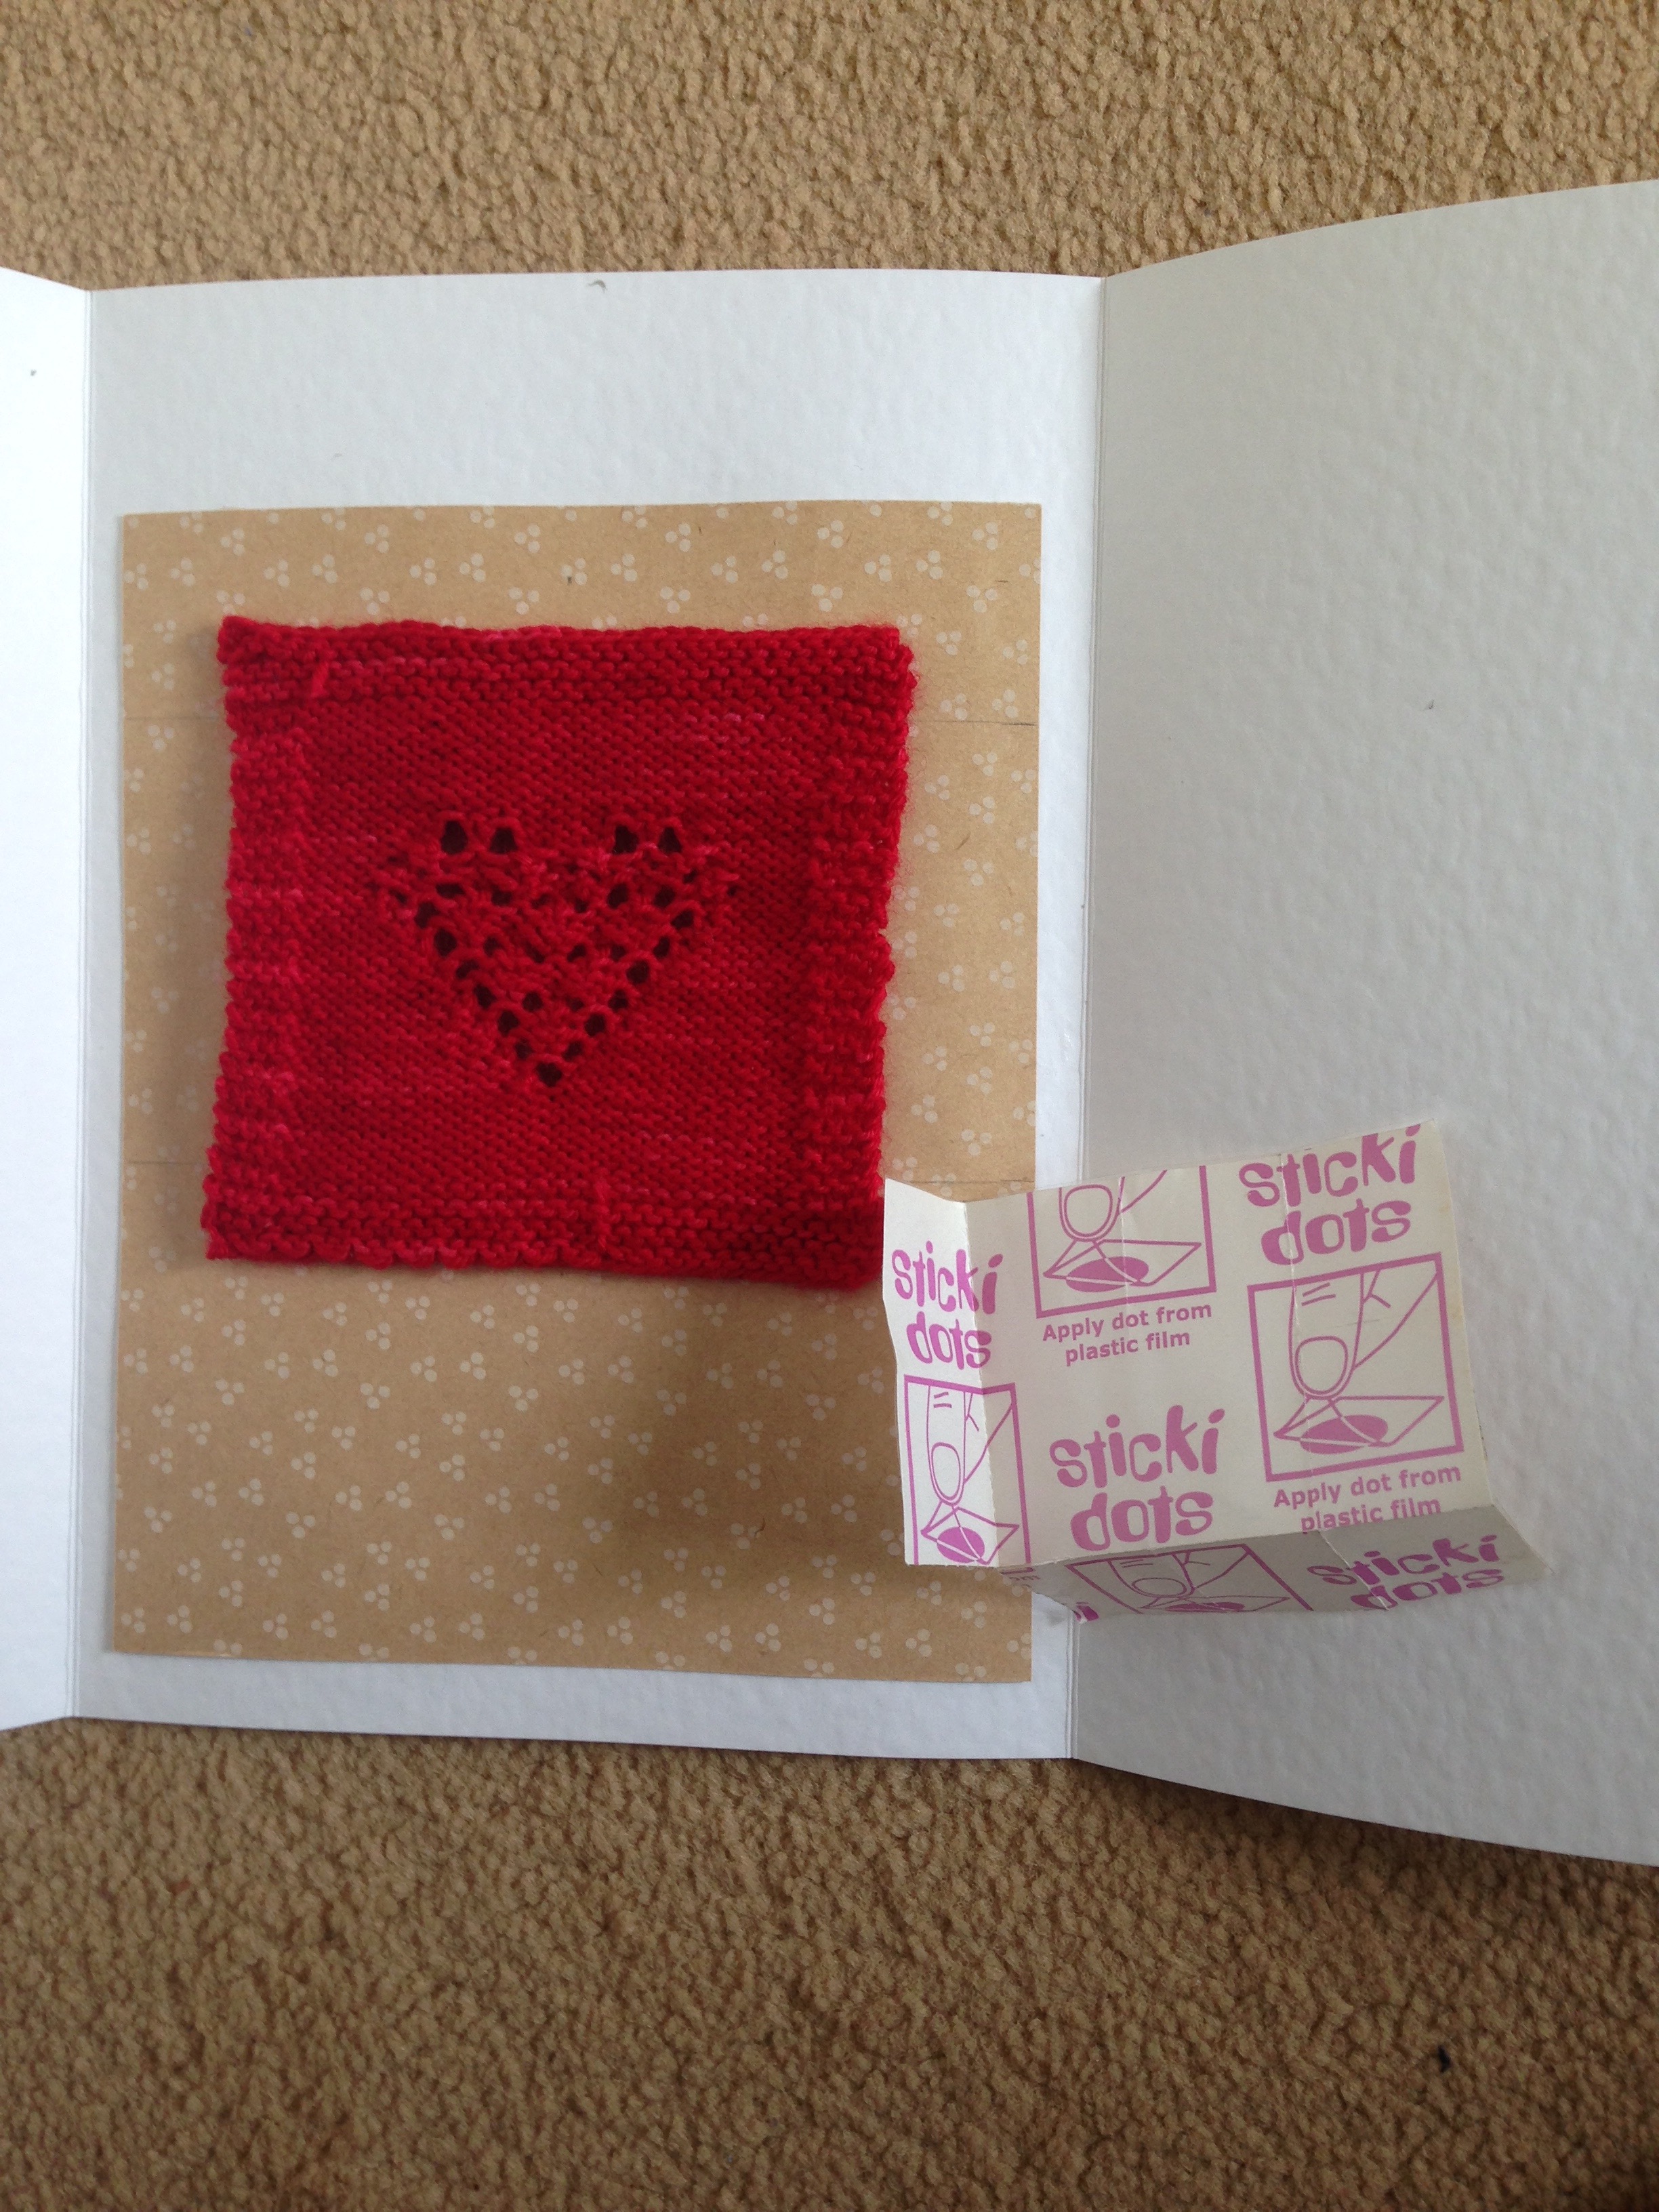
4. Use glue dots to stick your knitted heart to the inner flap that “looks through” the window in the front of the card. Put a glue dot at each corner on the WS of knitted motif. Position it neatly at the window. Close the card, thereby sticking it to the card’s inner flap.
5. Print out a motto (save my one below, or write your own) and glue it to the inside of the card.
Centred framesUse glue dots to stick the knitted motif to the card.The knitted motif is attached to the interior flap of the card.The assembled card. Note the decorative card is printed on both sides.Download for your own use, or make up your own!
Start: Saturday 21 February – 10:30
Estimated End: Saturday 21 February – 12:30
Auditorium: East Wing Dance Studio 2
Knitting Embellishments with Elanor King
Admission: £26 (including same day entry to unravel)
This workshop will explore what kinds of materials can be used as embellishments and where it’s appropriate to use them. We will consider the properties of the yarn, how the finished item will be used and what decorative effect the knitter wants to achieve.
Embellishments demonstrated will include knitted-in and sewn-on techniques e.g. thrums, loom bands, sequins and couching..”
Please bring 4mm needles and Dk yarn leftovers in your favourite colours OR a pattern you want to knit and decorate as well as yarn and needles appropriate to that pattern.
I’ve been cagey so far about what I’m calling my latest design – I hit upon what I think is a great name some time ago, and I didn’t want to jinx things by naming it publicly too early. I hear all sorts of stories about perfect names with no other dupes in the Ravelry database being snapped up the week before release.
I give you: Nostepinne
(and yes, I aliased it to Nostepinde too!)
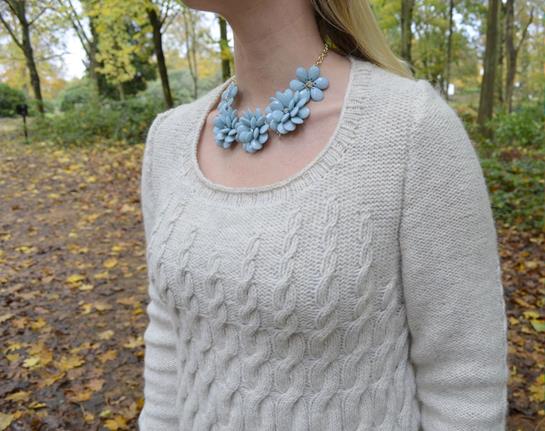
Before I knit Nostepinne, on cold days I would wear an old grey jumper of my husband’s. It felt like wearing a cuddle, but it looked like a sack of potatoes. For Nostepinne, I took the best features of that jumper – the pure wool, soft grey colour, roomy ease, slightly-longer-than-usual sleeves and added other, more feminine features. The U-shaped neckline is flattering and leaves plenty of room for layering, while the elegant “Nostepinne” cables hide subtle waist shaping and create a “sweetheart” shape over the bust.
A nostepinne is a tool for winding yarn into centre-pull balls or cakes. The balls of yarn created gradually get bigger the more you twist.
However, I’m also running a competition in my ravelry group to win a copy of the pattern for you and a friend. All you have to do is nominate your friend and say why you think s/he would like the Nostepinne pattern.
And sure, while you’re there, why don’t you join the group? I make sure to post all my latest news there, plus sneak peeks of what I’m up to next!
So the #giftalong2014 sale happened last week and it went quite well for me – a good few sales generated because of it for me, and I’ll definitely be participating again next year, if the lovely organisers hold it again – sure looked like a lot of work from over here! Thank you, if you happen to read this!
One of my fellow designers, Dani Berg, was also participating in the giftalong, and I took the opportunity to ask her some questions about her work.
Dani Berg
When and where do you get a chance to design: what’s your day like?
I mostly design in the afternoons. After I’m done with my day job and pick up the kids from school, but before dinner. I knit on designs in the evenings as well.
What pattern are you most proud of and why?
I’m really proud of the Snowscape shawl. It was knocking around in head for almost 2 years before I was finally able to have it look exactly the way I envisioned it.
Snowscape Shawl
What’s your best selling pattern? Did you have a feeling it would do well or was it a surprise?
The Serendipity Ear Band is far and way my best seller, although the Harvest Fling Shawl is catching up! I never expected it be as popular as it is, but I’m very pleased and grateful.
Harvest Fling
There’s a thread in the designer’s forum on frustration. What frustrations have you had?
Time. Time is biggest frustration. There’s never enough to accomplish all I wish I could, plus spend time with my family.
What tips would you give to an aspiring designer?
It takes a long time to build up a stable of patterns. Don’t rush it, quality counts! Tech editors. Get a good one!
How long is your design process? Where do you start and what does it take to get it published? How do you go about working up your original idea? Sketches, swatches, see how he yarn takes you? Where do you get your ideas in the first place?
I usually start with an idea, maybe from a stitch dictionary or a fashion magazine or the ether. I swatch – a lot. Then I sketch, and possibly work up a submission or proposal for yarn support. I try to write the bulk of the pattern before knitting the sample, but there are still a lot of changes and note taking during the knitting. Then there is rewriting, tech editing, and photos. The whole process varies wildly depending on deadlines
If you didn’t have yarn, how would you release steam/ relax? Do you *have* any free time?
I love to read, cook, bake. I generally love anything crafty. I don’t have much free time, but I try to take a little time each day for myself. Even if it’s just a few minutes to read before bed.
Who have you worked with in the industry that you’d love to work with again? Who inspires you?
I loved working with Stephanie Tallent on both Hitch and as my tech editor for most of self published patterns. She’s always a pleasure to work with! I hope to continue working with her for many years.
Alicia Tam and Mitts from Hitch
Inspiration: Anne Hanson. She’s amazing. She seems to have unending well of pattern inspiration and work her is just breathtaking. I would love to meet her one day!
What are you really glad I didn’t ask you? ;)
What are my future plans? I’m really flying by the seat of pants lately. ;-)
Getting there!
Only have to attach the sleeves. All the “knitting” is done, and I am waiting for the sleeves to dry, so I am about to cast on my knitmas gift! Yayness! Can’t wait to see how this jumper looks on Friday at the shoot. The weather looks absolutely woeful, so I’ve had to wrack my brains for an indoor location.
p.s. If you’re a regular reader, you’ll know of my penchant for etymology. I just had to look up rack v. wrack. Quite interestingly, either is useable wrt brains and nerves… Rack is edited so more often, but I prefer wrack myself in this context.
Xe


 Top is for wood, middle is HSS for metal and bottom for masonry.
 I improvised a plumbline with a weight and not just any old string, but some hand dyed fairysilk mohair.
 And ta dah! We have a working shower head holder thingy again. Yay me! Not bad for someone who’s heart was in their mouth the whole time that drill was making that noise. Anyway, now I have to go clean up the mess.


 I will be hosting a